Getting Started
Okay! Let’s build things
This chapter is to get you started in ROS building some first practical projects and finish building the demo.
Information to complete this course:
Basic Programming Knowledge.
- Basis of Programming.
- Comfortable using Python.
You need to have a minimum Linux CLI experience
You installed ROS and all Prerequisites (explained below)
Prerequisites
This course target ROS2 humble and the official guide recommends Ubuntu 22.04 Jammy Jellyfish because there are official debian packages; even so they offers Tier3 support for Ubuntu 20.04 Focal or Debian 11 but you need to build it from source.
Installation
To install ROS2 humble we recommend to follow the official guide.
Remember to install the full desktop version ros-humble-desktop.
Ubuntu 22.04
Install
Ubuntu 20.04/Debian11
Build from source
and finally, install colcon the build tool
$ sudo apt install python3-colcon-common-extensions
Setup
Remember to source this file /opt/ros/humble/setup.bash or equivalent in your shell to be able to access ROS2 commands.
Or execute this command and relaunch your terminal,
echo 'source /opt/ros/humble/setup.bash' >> ~/.bashrc
substitute .bashrc for your rc file. Ex: ~/.zshrc
Try it out!
1 - Building the Demo
A more real approach to learn the ROS basis.
Now, we can clone a template to solve a real time project to truly demonstrate your knowledge. Let’s code!
Problem to solve
As we delve into the world of autonomous driving software development, we are faced with the daunting task of navigating complex algorithms and cutting-edge technology. Yet, here we are, confronted with a GUI that seems to have been designed by someone who learned to code in their sleep xd.
One of the key components of autonomous driving software is the ability to detect and respond to environmental stimuli, such as obstacles, traffic signals, and other vehicles.
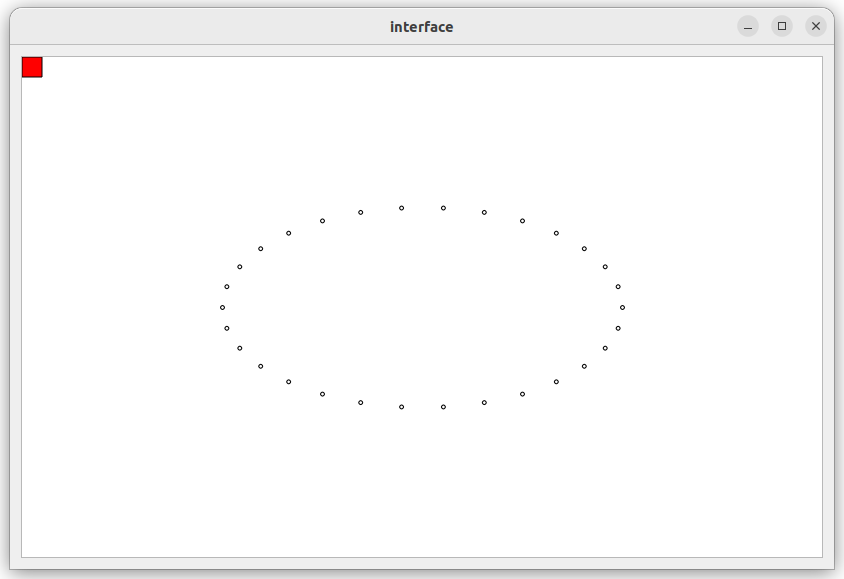
To illustrate this concept, we will be using a GUI that simulates a simple autonomous vehicle. The vehicle is represented by a red square that moves forward and bounces off the walls. The vehicle is equipped with a sensor that detects points in front of it, represented by circles. The goal of this exercise is to use ROS2 to control the orientation of the vehicle based on the location of the nearest point detected by the sensor.
This exercise is similar to what real-world autonomous driving software does. In a self-driving car, sensors such as lidar, radar, and cameras are used to detect obstacles, pedestrians, and other vehicles. The software then analyzes this data and generates control signals to adjust the vehicle’s speed and direction to avoid collisions and reach the desired destination.
By completing this exercise, you will gain practical experience in using ROS2 to control a simulated autonomous vehicle.
Building the demo
You can give the demo a try by cloning the code, building it, and executing the launch file that starts the whole system.
$ git clone https://github.com/martimolanes/sigue_lineas
$ cd sigue_lineas
$ colcon build && source install/setup.bash
$ ros2 launch demo_launcher demo.launcher.py
2 - First steps
First steps into recreating the demo
Creating the workspace
We’re going to start by making the workspace that will hold all our ROS packages.
$ mkdir ~/demo && cd ~/demo
$ mkdir src
We won’t do cd to any other directory, we will always work from this path. This makes it less confusing because the ROS build will write the build files to the current working directory, and we don’t want to make a mess.
Creating the packages needed
Ultimately, we will have the following structure:
| Package | Build type | Notes |
|---|
world | ament_python | Handles all logic and physics of the car |
driverless | ament_python | Algorithm for calculating the steer |
um_msgs | ament_cmake | Contains all custom messages |
qt_interface | ament_python | This package will be provided by us |
To make these packages, we can start using the following command:
$ ros2 pkg create PACKAGE --build-type BUILD_TYPE --destination-directory src --dependencies rclpy
The last package, qt_interface, can be downloaded from this repository and imported into src.
Once we have our packages set up, we can go to the next chapter!
3 - Implementing world
Writing logic and physics for the world
Creating the node
Most nodes will share basic boilerplate which can be copied from the examples ROS gives:
$ cp /opt/ros/$ROS_DISTRO/share/launch_testing_ros/examples/talker.py src/world/world/world.py
Now rename your node World and add the following lines:
class World(Node):
    def __init__(self):
      super().__init__('world')
      self.generate_waypoints()

    def generate_waypoints(self):
        self.waypoints = []

        WIDTH = 200
        HEIGHT = 100

        for i in range(30):
            angle = i * 2 * math.pi / 30
            x = math.cos(angle) * WIDTH
            y = math.sin(angle) * HEIGHT
            self.waypoints.append(Waypoint(x=x, y=y, idx=i))
This code generates the waypoints that the car will follow. As you can see, we are just drawing an ellipse (that you can resize by tweaking with the WIDTH and HEIGHT values), but the shape can be any shape you want.
However, if you tried to execute this code, you’d face an error because Waypoint is a custom message that we haven’t defined yet.
Defining the Waypoint message
We need to create a message to represent a point in space. If you have read the previous chapters, you know that messages are defined in the um_msgs directory. In said package, create a directory msg and a file called Waypoint.msg inside that directory, such that the structure of the package is:
src/um_msgs/
├── CMakeLists.txt
├── include
│   └── um_msgs
├── msg
│   └── Waypoint.msg
├── package.xml
└── src
If you’re not sure how to implement this, check the reference .
A waypoint is defined as such:
float64 x
float64 y
uint16 idx
And since we’re at it, we can also define Waypoints.msg like this:
Waypoint[] waypoints
Publishing the waypoints
After importing the message (from um_msgs.msg import Waypoint), we can already execute our world node. All it does is generate the waypoints, but we don’t do anything with them. Let’s publish them.
In the __init__ method, include the following lines:
def __init__(self):
    ...
    self.waypoints_publisher = self.create_publisher(Waypoints, '/world_waypoints', 10)
    self.waypoints_publisher_timer = self.create_timer(3.0, self.publish_waypoints)
These lines of code create a ROS publisher object and a timer object that periodically calls a callback function to publish messages to a specific ROS topic. Note that you can’t rename this topic because qt_interface reads from it.
Next, define the callback function:
def publish_waypoints(self):
    msg = Waypoints(msg=self.waypoints)
    self.waypoints_publisher.publish(msg)
Note that this is also a method in our node and should be indented to the same height as __init__.
Executing the code
Finally, if we execute this code and the interface, we should already see our waypoints being rendered into the canvas.