This is the multi-page printable view of this section. Click here to print.
Documentation
- 1: Demo
- 2: Basic Concepts
- 3: Getting Started
- 3.1: Building the Demo
- 3.2: First steps
- 3.3: Implementing world
- 4: References
- 4.1: Concepts (ROS Guide)
- 4.2: launch file
- 4.3: rosdep
- 4.4: ROS on same LAN
- 4.5: Tips and Tricks
1 - Demo
In this course, we will try to replicate the following demo:

While it might seem like a simple line-follower project, it actually requires quite a few tricks and requires most of the features that ROS2 provides, like:
- How to compile a ROS workspace.
- Writing modular nodes, each having several publishers/listeners.
- How to setup a package and specify which files are executable.
Here is the rqt_graph of the demo:

As we can see, it’s actually not that simple.
2 - Basic Concepts
Note: This page was generated from UM23-Docs/ros-introduction.md and may not always be up to date.
Node
A node is a program that is responsible for carrying out a specific task, such as sending or receiving data from a sensor, or performing a computational task. Nodes communicate with each other through topics, which allow them to exchange information and coordinate their activities.
Topic
Topics are channels that nodes use to communicate with each other. Think of a topic as a bulletin board where nodes can publish and subscribe to messages related to a specific topic of interest.
For example, a node that has GPS sensors could use a topic to publish information about the car’s position, speed, and rotation. Other nodes that need access to this information, such as a control node, could subscribe to this topic to receive and process the data to perform actions based on the information received.
Topics are designed to be flexible and decentralized, which means that nodes can publish and subscribe to topics without having to know the details of the other nodes’ implementation.
ROS Msg
Messages are the data structures used to represent information exchanged between nodes through topics. Messages define the format, data types, and semantics of the data that a node will send or receive through a topic.
Publisher
A publisher is a module of a node that “write/publish/paste” data in a topic.
You can have python program that makes a specific task and publish the result in a certain topic.
Suscriber
A suscriber is a module of a node that “read/copy” data of a topic.
You can have a python program that to make a specific task reads data from a certain topic.
3 - Getting Started
This chapter is to get you started in ROS building some first practical projects and finish building the demo.
Information to complete this course:
Basic Programming Knowledge.
- Basis of Programming.
- Comfortable using Python.
You need to have a minimum Linux CLI experience
You installed ROS and all Prerequisites (explained below)
Prerequisites
This course target ROS2 humble and the official guide recommends Ubuntu 22.04 Jammy Jellyfish because there are official debian packages; even so they offers Tier3 support for Ubuntu 20.04 Focal or Debian 11 but you need to build it from source.
Installation
To install ROS2 humble we recommend to follow the official guide.
Remember to install the full desktop version ros-humble-desktop.
Ubuntu 22.04
Ubuntu 20.04/Debian11
and finally, install colcon the build tool
$ sudo apt install python3-colcon-common-extensions
Setup
Remember to source this file /opt/ros/humble/setup.bash or equivalent in your shell to be able to access ROS2 commands.
Or execute this command and relaunch your terminal,
echo 'source /opt/ros/humble/setup.bash' >> ~/.bashrc
substitute .bashrc for your rc file. Ex: ~/.zshrc
Try it out!
3.1 - Building the Demo
Now, we can clone a template to solve a real time project to truly demonstrate your knowledge. Let’s code!
Problem to solve
As we delve into the world of autonomous driving software development, we are faced with the daunting task of navigating complex algorithms and cutting-edge technology. Yet, here we are, confronted with a GUI that seems to have been designed by someone who learned to code in their sleep xd.
One of the key components of autonomous driving software is the ability to detect and respond to environmental stimuli, such as obstacles, traffic signals, and other vehicles.
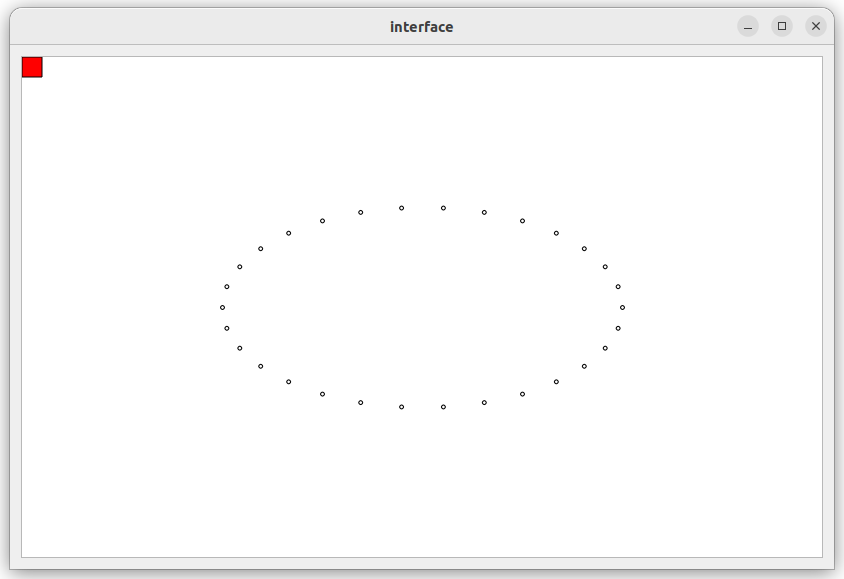
To illustrate this concept, we will be using a GUI that simulates a simple autonomous vehicle. The vehicle is represented by a red square that moves forward and bounces off the walls. The vehicle is equipped with a sensor that detects points in front of it, represented by circles. The goal of this exercise is to use ROS2 to control the orientation of the vehicle based on the location of the nearest point detected by the sensor.
This exercise is similar to what real-world autonomous driving software does. In a self-driving car, sensors such as lidar, radar, and cameras are used to detect obstacles, pedestrians, and other vehicles. The software then analyzes this data and generates control signals to adjust the vehicle’s speed and direction to avoid collisions and reach the desired destination.
By completing this exercise, you will gain practical experience in using ROS2 to control a simulated autonomous vehicle.
Building the demo
You can give the demo a try by cloning the code, building it, and executing the launch file that starts the whole system.
$ git clone https://github.com/martimolanes/sigue_lineas
$ cd sigue_lineas
$ colcon build && source install/setup.bash
$ ros2 launch demo_launcher demo.launcher.py
3.2 - First steps
Creating the workspace
We’re going to start by making the workspace that will hold all our ROS packages.
$ mkdir ~/demo && cd ~/demo
$ mkdir src
We won’t do cd to any other directory, we will always work from this path. This makes it less confusing because the ROS build will write the build files to the current working directory, and we don’t want to make a mess.
Creating the packages needed
Ultimately, we will have the following structure:
| Package | Build type | Notes |
|---|---|---|
world | ament_python | Handles all logic and physics of the car |
driverless | ament_python | Algorithm for calculating the steer |
um_msgs | ament_cmake | Contains all custom messages |
qt_interface | ament_python | This package will be provided by us |
To make these packages, we can start using the following command:
$ ros2 pkg create PACKAGE --build-type BUILD_TYPE --destination-directory src --dependencies rclpy
The last package, qt_interface, can be downloaded from this repository and imported into src.
Once we have our packages set up, we can go to the next chapter!
3.3 - Implementing world
Creating the node
Most nodes will share basic boilerplate which can be copied from the examples ROS gives:
$ cp /opt/ros/$ROS_DISTRO/share/launch_testing_ros/examples/talker.py src/world/world/world.py
Now rename your node World and add the following lines:
class World(Node):
    def __init__(self):
      super().__init__('world')
      self.generate_waypoints()

    def generate_waypoints(self):
        self.waypoints = []

        WIDTH = 200
        HEIGHT = 100

        for i in range(30):
            angle = i * 2 * math.pi / 30
            x = math.cos(angle) * WIDTH
            y = math.sin(angle) * HEIGHT
            self.waypoints.append(Waypoint(x=x, y=y, idx=i))
This code generates the waypoints that the car will follow. As you can see, we are just drawing an ellipse (that you can resize by tweaking with the WIDTH and HEIGHT values), but the shape can be any shape you want.
However, if you tried to execute this code, you’d face an error because Waypoint is a custom message that we haven’t defined yet.
Defining the Waypoint message
We need to create a message to represent a point in space. If you have read the previous chapters, you know that messages are defined in the um_msgs directory. In said package, create a directory msg and a file called Waypoint.msg inside that directory, such that the structure of the package is:
src/um_msgs/
├── CMakeLists.txt
├── include
│   └── um_msgs
├── msg
│   └── Waypoint.msg
├── package.xml
└── src
If you’re not sure how to implement this, check the reference .
A waypoint is defined as such:
float64 x
float64 y
uint16 idx
And since we’re at it, we can also define Waypoints.msg like this:
Waypoint[] waypoints
Publishing the waypoints
After importing the message (from um_msgs.msg import Waypoint), we can already execute our world node. All it does is generate the waypoints, but we don’t do anything with them. Let’s publish them.
In the __init__ method, include the following lines:
def __init__(self):
    ...
    self.waypoints_publisher = self.create_publisher(Waypoints, '/world_waypoints', 10)
    self.waypoints_publisher_timer = self.create_timer(3.0, self.publish_waypoints)
These lines of code create a ROS publisher object and a timer object that periodically calls a callback function to publish messages to a specific ROS topic. Note that you can’t rename this topic because qt_interface reads from it.
Next, define the callback function:
def publish_waypoints(self):
    msg = Waypoints(msg=self.waypoints)
    self.waypoints_publisher.publish(msg)
Note that this is also a method in our node and should be indented to the same height as __init__.
Executing the code
Finally, if we execute this code and the interface, we should already see our waypoints being rendered into the canvas.
4 - References
4.1 - Concepts (ROS Guide)
Tabla de Contenidos
Guía
Getting Started
Una vez tengas un workspace, puedes buildearlo de la siguiente forma:
$ colcon build --symlink-install
Nota: Gracias a
--symlink-install, no necesitas recompilar cada vez que hagas una modificación en un archivo de Python. Modificaciones en otros archivos o en C++ requieren recompilar y generalmente volver a hacer elsource. Esto creará varios directorios:log,install,build. En caso de que la compilación falle, puedes consultar los logs (log/latest_build).
Ahora, asumiendo que estás utilizando bash, sourcea el setup.bash.
source install/setup.bash
Esto tambien proporcionará autocompletado en la linea de comandos.
Crear un package nuevo
En tu workspace, ejecuta el siguiente comando reemplazando example_package por el nombre del paquete:
$ ros2 pkg create example_package --build-type ament_python --dependencies rlcpy
Si necesitas añadir más dependencias, puedes especificarlas en el package.xml.
Una vez ejecutado el comando, se creará una directorio con el nombre que le has dado con todo lo necesario para empezar a desarrollar en Python con la siguiente estructura.
example_package
├── example_package
│   └── __init__.py
├── package.xml
├── resource
│   └── example_package
├── setup.cfg
├── setup.py
└── test
    ├── test_copyright.py
    ├── test_flake8.py
    └── test_pep257.py
Tus scripts los crearás en el directorio example_package/example_package.
Crear un nodo nuevo
Puedes utilizar los ejemplos que vienen con ROS (talker.py o listener.py) como base:
$ cp /opt/ros/$ROS_DISTRO/share/launch_testing_ros/examples/talker.py example_package/mi_nodo.py
En el caso de que quieras que este script sea ejecutable, marca en el setup.py de tu package el entry_point (es decir, la función main).
from setuptools import setup
package_name = 'example_package'
setup(
    name=package_name,
    # ...
    entry_points={
        'console_scripts': [
            'NOMBRE_SCRIPT = example_package.NOMBRE_SCRIPT:main',
        ],
    },
)
Ahora podrás ejecutarlo de la siguiente forma:
$ ros2 run example_package NOMBRE_SCRIPT
Leer mensajes de topics
Saber los topics activos y el tipo de mensajes que mandan (gracias a la opción -t):
$ ros2 topic list -t
/parameter_events [rcl_interfaces/msg/ParameterEvent]
/rosout [rcl_interfaces/msg/Log]
...
Si sabemos el nombre del topic, podemos ver la especificación directamente:
$ ros2 topic info <TOPIC>
Ahora, podemos leer qué mensajes se están publicando a tiempo real usando el siguiente comando:
$ ros2 topic echo <TOPIC>
Como ver la estructura de un mensaje en yaml:
$ ros2 interface show geometry_msgs/msg/Pose
# A representation of pose in free space, composed of position and orientation.
Point position
  float64 x
  float64 y
  float64 z
Quaternion orientation
  float64 x 0
  float64 y 0
  float64 z 0
  float64 w 1
Publicar en un topic desde terminal
$ ros2 topic pub <TOPIC> <MSG_TYPE> '<args>'
Donde los argumentos son los atributos necesarios para construir el mensaje deseado.
Usando como ejemplo el mensaje geometry_msgs/msg/Pose del apartado anterior. Podemos la orientación tiene un valor por defecto, así que no tenemos que especificarlo.
$ ros2 topic pub <TOPIC> <MSG_TYPE> '{ position: { x: 0, y: 0, z: 0 } }'
publisher: beginning loop
...
Lanzar un launcher
Puedes usar tab para autocompletar. Si ROS no encuentra tu paquete, lee la sección de package.
$ ros2 launch PACKAGE LAUNCHER
Crear un msg propio
Antes de crear un msg propio, asegurate de que no existe ninguno que satisfazca tus necesidades. Puedes ver los mensajes que trae ROS por defecto en std_msgs y geometry_msgs, o los mensajes que utiliza la universidad de Edimburgo: eufs_msgs.
Si no hay ninguno que te sirva, puedes crear uno propio.
- En general, se recomienda almacenar todos los mensajes en un package aparte, que solo tenga los archivos
.msgy/o funcionalidad muy especifica relacionada con ellos.
Ten en cuenta que los archivos
.msgrequieren compilarse a Python/C++, y este proceso requiere decmake, la herramienta de automaticación de compilado. Esta herramienta no está disponible en los packages de Python así que probablemente necesites crear un paquete nuevo:
$ ros2 pkg create uvigo_msgs --build-type ament_cmake
- Una vez tengas el package, añade estas lineas al archivo
package.xml
  <build_depend>rosidl_default_generators</build_depend>
  <exec_depend>rosidl_default_runtime</exec_depend>
  <member_of_group>rosidl_interface_packages</member_of_group>
Estas líneas especifican las dependencias del package (por ejemplo si quieres que tus mensajes tengan atributos cuyos tipos están definidos en eufs_msgs, std_msgs, o otro package) y el miembro del grupo para generar y usar interfaces ROS2 (mensajes, servicios y acciones) mediante la herramienta rosidl.
- En el archivo
CMakeLists.txt, añade estas lineas:
# find dependencies
find_package(ament_cmake REQUIRED)
+find_package(rosidl_default_generators REQUIRED)
# Al final del archivo
endif()
+rosidl_generate_interfaces(${PROJECT_NAME}
+  "msg/MiMensaje.msg"
+)
ament_package()
- Ahora ya puedes crear tu directorio
msgy añadir ahí tu mensaje propio:
# Descripción de mi mensaje
std_msgs/Header header
float64 x
float64 y
- Finalmente, comprueba que todo ha ido correcto:
$ colcon build && source install/setup.bash
...
$ ros2 interface show uvigo_msgs/msg/MiMensaje
# Descripción de mi mensaje
std_msgs/Header header
float64 x
float64 y
Recomendaciones
- Puedes ver los nodos y topics que se ejecutan en cada momento ejecutando el programa
rqt_graphen la terminal. - Una vez instalado ROS, tenéis ejemplos de paquetes en
/opt/ros/$ROS_DISTRO/share
4.2 - launch file
ROS2 launch file allow us to start up and configure a number of executables containing ROS 2 nodes simultaneously. You don’t to execute each node with a ros2 run <package> <node>.
ROS 2 launch files can be written in Python, XML, and YAML. Python, XML, and YAML for ROS 2 Launch Files
In this course this little example assume you want to write your launch file on YAML; but it is more common to find launch files written on Python.
How to launch a launcher
ros2 launch <launcher>.yaml
if you have more than a package you need to specify the package.
ros2 launch <package> <launcher>.yaml
4.3 - rosdep
What is rosdep?
rosdep is ROS’s dependency management utility that can work with ROS packages and external libraries. rosdep is a command-line utility for identifying and installing dependencies to build or install a package.
When we need rosdep
- Dependencies to build our Project.
- Dependencies to execute our Project.
package.xml
package.xml is the file where is specified all the dependencies for our project. Should be an exhaustive list of any non-builtin libraries and packages it requires.
The dependencies need to be in package.xml like:
For dependencies only used in building the code, use
<build_depend>.For dependencies needed by headers the code exports, use
<build_export_depend>.For dependencies only used when running the code, use
<exec_depend>.Recommended by default: For mixed purposes, use
<depend>, which covers build, export, and execution time dependencies.
Example package.xml
<?xml version="1.0"?>
<?xml-model href="http://download.ros.org/schema/package_format3.xsd" schematypens="http://www.w3.org/2001/XMLSchema"?>
<package format="3">
  <name>eufs_launcher</name>
  <version>2.0.0</version>
  <description>Configures and launches eufs_sim.</description>

  <maintainer email="cambobmat@icloud.com">Cameron Matthew</maintainer>
  <maintainer email="siliconlad@protonmail.com">Angus Stewart</maintainer>

  <license>MIT</license>

  <url type="website">http://eufs.co</url>
  <url type="repository">https://gitlab.com/eufs/eufs_sim</url>
  <url type="bugtracker">https://gitlab.com/eufs/eufs_sim/issues</url>

  <depend>rclpy</depend>
  <depend>rqt_gui</depend>

  <depend>launch</depend>
  <depend>launch_ros</depend>

  <depend>python3-yaml</depend>
  <depend>python3-pandas</depend>

  <export>
    <build_type>ament_python</build_type>
    <rqt_gui plugin="${prefix}/plugin.xml"/>
  </export>
</package>
4.4 - ROS on same LAN
ROS_DOMAIN_ID
By default, ROS 2 communication is not limited to localhost. So, you can have a distributed node system only by connecting the computers via Ethernet.
If you want to change the ROS_DOMAIN_ID you need to choose a number between 0 and 101, inclusive, and:
export ROS_DOMAIN_ID=<your_domain_id>
Changing ROS_DOMAIN_ID leads to have a isolated environment for your ROS nodes. If you want to have two or more computers to communicate, you need to have the same ID.